Mastering is the final step before a song or album is considered finished. There are audio engineers that specialize and dedicate their entire careers to the art of mastering. Audio mastering optimizes sound playback on all playback systems by applying corrective equalization and dynamic enhancement. I am in no way a mastering master, but wanted to provide some techniques that I use.
1) A clean mix. Before even thinking about mastering a song, the mix should be finalized. This means eq’ing, compressing and adding all the final touches to the track to have it sound the way it should. It is also important to make sure that the mix doesn’t peak and leaves room for the mastering to work its magic.
2) Master EQ. Once the mixing is done, bring the single bounced WAV track of the song into a new session – the “mastering session.” On the master channel, the first plugin on the “master chain” should be an equalizer. I prefer using Waves’ Linear Phase Eq Broadband. However, the stock Logic or Pro Tools equalizers work great too.
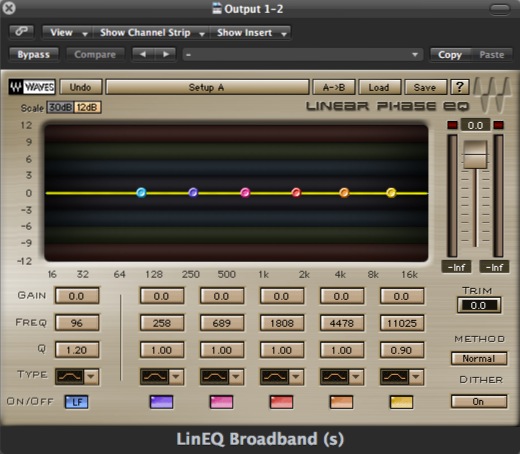 Make only minor changes to the eq at this stage. Most of the noticeable eq’ing issues should have been worked out during the mixing stage. Depending on what the track needs, I lightly boost the bass (between the 64-128 range) and high frequencies (between the 4k and 8k range) to brighten up the track and give it a little more body.
3) Compression. The second plugin in my master chain is a compressor. A compressor acts as the glue that brings the track together and evens out both odd frequencies and levels in the mix. Waves provides some great preset options to start off with. I usually load up the “Mastering” preset and adjust from there. I would recommend keeping the release at automatic, and keep the ratio low. The volume will change as you turn the threshold. Don’t turn the threshold up too high because it will max out the track volume leaving no room for the rest of the plugins in the master chain to perform their duties. The “industry standard” volume will be achieved with a different plugin, so don’t fret.

4) Stereo Imaging. This technique makes the overall mix wider, giving the track more body. However, apply stereo imaging with care because a very wide master can lead to phasing issues. Phasing will make the track unenjoyable to listen to, which is exactly the opposite of what we want. I prefer either using Waves’ Center or Logic’s Stereo Spread. Although Center doesn’t provide much control over frequencies, it does a great job.
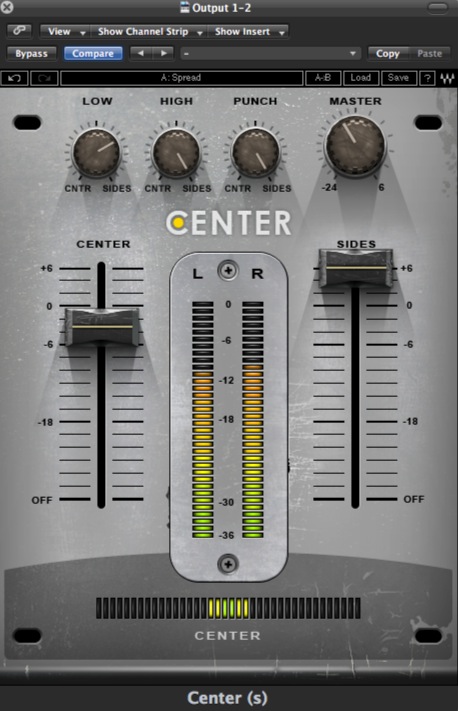 Logic’s Stereo Spread is also great. The image below shows a recommended setting for how I usually use it in a master channel. Avoid spreading any frequencies below 100Hz because bass frequencies don’t carry any directional information and have more of an impact in mono than in stereo.
 5) Maximizer. A maximizer is used to bring the song’s volume to “industry” level. It depends on the song, but I prefer using Waves’ L3 Ultramaximizer. This plugin does a great job boosting volume levels without making the track sound muddy or distorted.
 The “Hi Res CD Master” preset is pretty good. I usually use it but then adjust the threshold accordingly. Moving the threshold down will bring the overall volume level up. I usually leave the ceiling at -0.2 and just focus on the threshold level.
6) Fade Out. The final step is to make sure that the track fades to black and ends at the desired time. A lot of the time it is recommended to leave a “tail” at the end of the song when exporting the mix. This allows for the end time to be decided while mastering. You don’t want the end to be too abrupt or too long.
This is what the master channel should look like.
![]() These techniques can be applied to a single song or to an entire album. If using these techniques for an album, it is integral to put each song on separate audio channels to provide more control over volume and equalization. The goal when mastering an album is making sure the volume levels are consistent and that each song flows nicely into the next.
These techniques can be applied to a single song or to an entire album. If using these techniques for an album, it is integral to put each song on separate audio channels to provide more control over volume and equalization. The goal when mastering an album is making sure the volume levels are consistent and that each song flows nicely into the next.
I offer mixing and mastering services, so please feel free to contact me if you are interested. I hope this short tutorial helps and good luck!